|
前言:
论文地址: https://arxiv.org/pdf/1512.03385.pdf
残差网络是由来自Microsoft Research的4位学者提出的卷积神经网络,在2015年的ImageNet大规模视觉识别竞赛(ImageNet Large Scale Visual Recognition Challenge, ILSVRC)中获得了图像分类和物体识别的优胜。 残差网络的特点是容易优化,并且能够通过增加相当的深度来提高准确率。其内部的残差块使用了跳跃连接,缓解了在深度神经网络中增加深度带来的梯度消失问题 [1] 。
目录:
1 简介
2 RestNet 网络结构
3 ResNet 网络
4 代码
5 DesNet
一 简介
1.1 现有问题
网络退化

深的神经网络很难训练,随着网络层次逐渐增加, 梯度会出现弥散|爆炸,
错误率反而会增加。如上图
在CIFAR-10 上实验结果:
左图为 Train error ,右图为 test error.
但是 56 层的网络 误差比 20 层更高。
1.2 Resnet 优势

如上图,在ImageNet 上训练的结果
细的线条代表 训练误差, 粗的线条代表验证集上的误差

如上图
现有网络: 34-layers 比 18-layer 误差更高
Resnet: 34-layers 比 18-layer 误差更低,效果更好
其性能随着网络层次的增加,也同步增强.
1.3 ResNet 在各种数据集上的表现

二 RestNet 网络结构
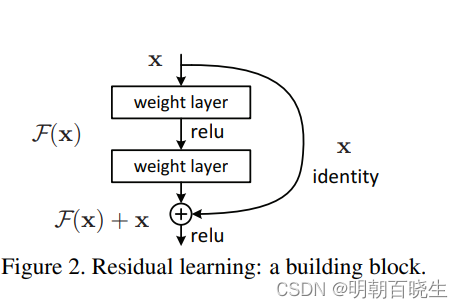
2.1 核心思想j解释一
将堆叠的几层layer称之为一个block。
已经学的的小模型为x, 堆叠部分用拟合函数f(x)表示。
如果期望的潜在映射为H(x).H(x)性能至少要包含之前的小模型x,
H(x)= x+f(x)
f(x)+x 构成的block称之为Residual Block,即残差块.
其中:
f(x)=h(x)-x 称为残差路径
x路径为identity mapping恒等映射,称之为”shortcut”。
图中的⊕为element-wise addition,要求参与运算的f(x)和x的尺寸要相同。
其梯度表达方式如下: 不会因为残差块部分 导致梯度消失

2.2 核心思想解释2:
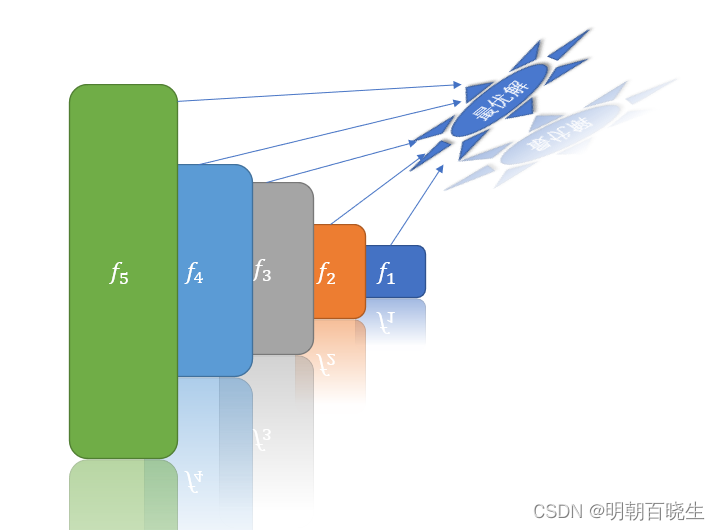
如上图,随着模型网络层次的加深,模型的复杂度越来越高,
但是跟最优解的模型偏差会增大。
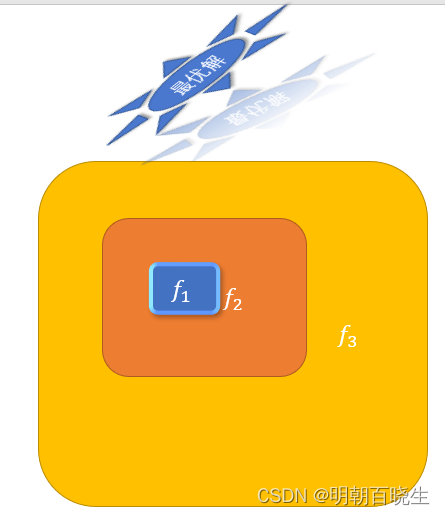
如上图,如果每叠加一层,至少包含上一层的小模型,则
整个模型肯定会比原来更加接近最优解,不会变差,
ResNet 就是基于该思想。
2.3 block 分类
根据残差路径的不同 ,可以大致分成2种,如下两张图:
左图“basic block”。basic block由2个3×3卷积层构成,
右图bottleneck:用于先降维再升维,主要出于降低计算复杂度的现实考虑,称之为“bottleneck block”,
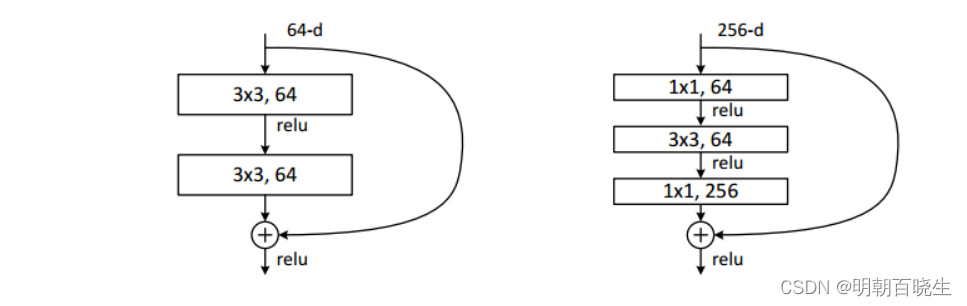
2.4 bottleneck 结构
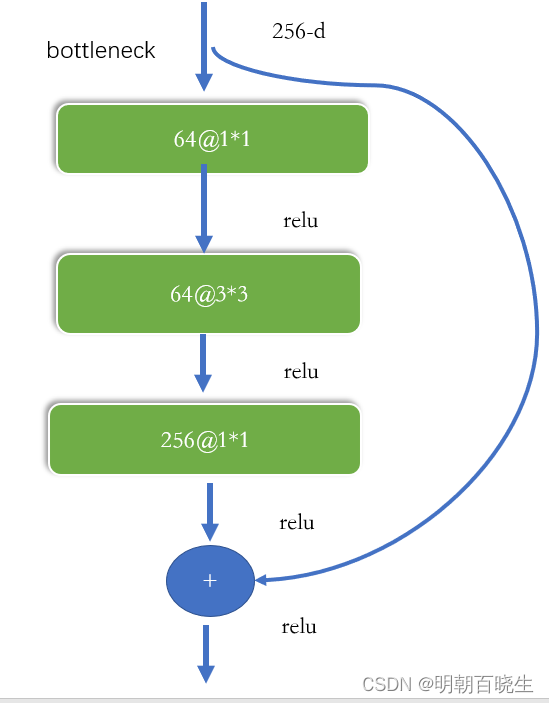
参数量:
64*256*1*1=16k64*64*3*3=36k256*64*1*1=16k总参数量: 70k
如果直接用一256@3*3 参数量为256*256*3*3= 600k
降低了参数量。
2.5 shortcut
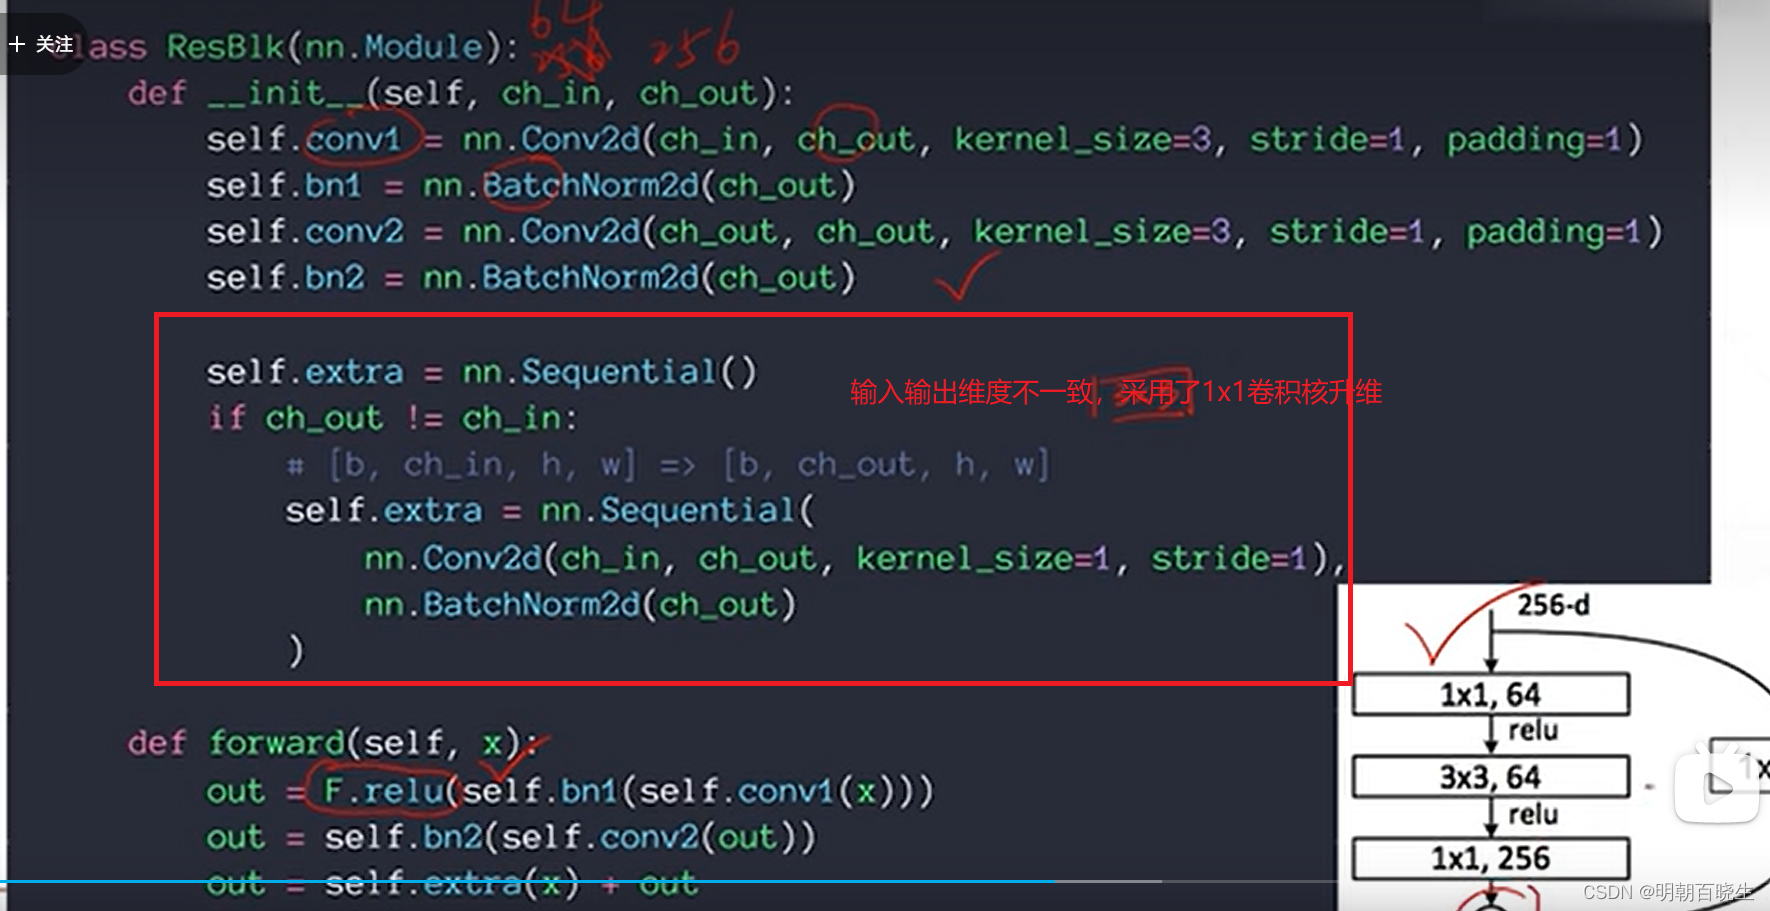
shortcut路径大致也可以分成2种,取决于残差路径是否改变了feature map数量和尺寸.
一种是将输入x原封不动地输出.
另一种则需要经过1×1卷积来升维 or/and 降采样,主要作用是将输出与F(x)路径的输出保持shape一致,对网络性能的提升并不明显,两种结构如下图所示
,
三 ResNet 网络
训练超参数值mini-batch256weight-decay0.0001momentum0.9iter60*10^4图片分辨率224,256,384,480.640
如下图,相对34-layer plain ,34-layer residual 增加了
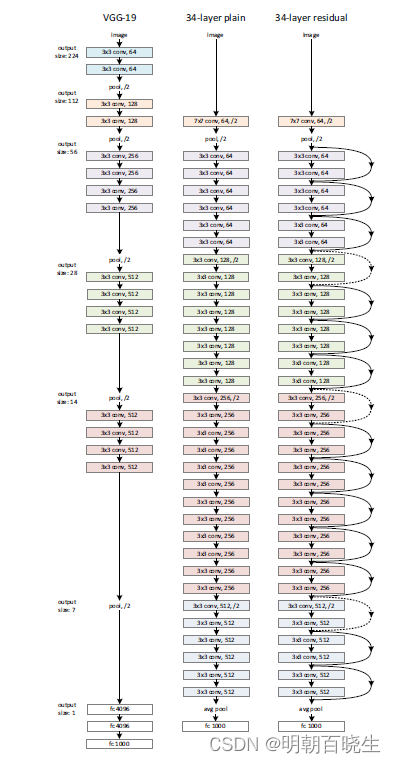
跟VGG 相比主要增加了Residual Block

ResNet的设计有如下特点:
与plainnet相比,ResNet多了很多“旁路”,即shortcut路径,其首尾圈出的layers构成一个Residual Block;ResNet中,所有的Residual Block都没有pooling层,降采样是通过conv的stride实现的;分别在conv3_1、conv4_1和conv5_1 Residual Block,降采样1倍,同时feature map数量增加1倍,如图中虚线划定的block;通过Average Pooling得到最终的特征,而不是通过全连接层;每个卷积层之后都紧接着BatchNorm layer,为了简化,图中并没有标出;
备注:
这里的PlainNet,顾名思义,仅仅保留必须的部分,作为网络的“地基”,在PlainNet基础上一点点往里面加东西。
arXiv 22 | 旷视 NAFNet:手把手构建图像复原的简单基线(SOTA) - 知乎
四 代码


下面代码用的是手写数字集里面的灰度图 ,图片大小只有28*28
所以用的卷积核 stride ,大小和论文里面有点差异
总体流程一下
import torch
from torch import nn, optim
from torchvision import datasets
from torch.utils.data import DataLoader
from torchvision import transforms
import torch.nn.functional as F
#https://blog.csdn.net/qq_42233059/article/details/126568373
#https://blog.csdn.net/qq_42233059/article/details/126568373
#3*3 卷积核 接一个 3*3 卷积核
class BaicsBlock(nn.Module):
# 主分支的卷积个数的倍数
def expansion(self):
expansion = 1
return expansion
def __init__(self, in_channel, out_channel, stride=1, downsample=None):
super(BaicsBlock, self).__init__()
self.conv1 = nn.Conv2d(in_channels= in_channel,
out_channels= out_channel,
kernel_size=3,
stride=stride,
padding=1,
bias=False)
self.bn1 = nn.BatchNorm2d(out_channel)
self.relu =nn.ReLU(inplace=True)
self.conv2 = nn.Conv2d(in_channels= out_channel,
out_channels=out_channel,
kernel_size=3,
stride=stride,
padding=1,
bias=False)
self.bn2 = nn.BatchNorm2d(out_channel)
self.downsample = downsample # 下采样参数,虚线的残差结构
def forward(self, x):
# 捷径分支下采样参数保存变量
identity = x
if self.downsample is not None:
#print("\n ---downsample ---")
identity = self.downsample(x)
x = self.conv1(x)
x = self.bn1(x)
x = self.relu(x)
x = self.conv2(x)
x = self.bn2(x)
#print("\n x.shape, indentity.shape",x.shape, identity.shape)
h =x+identity
h = self.relu(h)
#print("\n shape h",h.shape)
return h
class Bottleneck(nn.Module):
def expansion(self):
expansion = 4
return expansion
def __init__(self, in_channel, out_channel, stride=1, downsample=None):
super(Bottleneck, self).__init__()
#1x1@64
self.conv1 = nn.Conv2d(in_channels= in_channel,
out_channels=out_channel,
kernel_size=1,
stride=1,
padding=1,
bias=False)
self.bn1 = nn.BatchNorm2d(out_channel)
self.relu = nn.ReLU(inplace=True)
#3x3@64
self.conv2 = nn.Conv2d(in_channels= out_channel,
out_channels=out_channel,
kernel_size=3,
stride=stride,
padding=1,
bias=False)
self.bn2 = nn.BatchNorm2d(out_channel)
#1x1@256
self.conv3 = nn.Conv2d(in_channels= out_channel,
out_channels=out_channel*4,
kernel_size=1,
stride=1,
padding=1,
bias=False)
self.bn3 = nn.BatchNorm2d(out_channel*4)
self.downsample = downsample
def forward(self, x):
identity = x
if self.downsample is not None:
identity = self.downsample(x)
x = self.conv1(x)
x = self.bn1(x)
x = self.relu(x)
x = self.conv2(x)
x = self.bn2(x)
x = self.relu(x)
x = self.conv3(x)
x = self.bn3(x)
h =x+ identity
h = self.relu(h)
return h
class ResNet(nn.Module):
def __init__(self, block, block_list,num_classes=10, include_top=True,img_channels=1):
super(ResNet, self).__init__()
self.include_top = include_top
self.in_channel = 64
# 第一层卷积层,28×28 灰度手写数字图像,图像太小了,所以输出为28,卷积核3*3,@64 stride=1
self.conv1 = nn.Conv2d(in_channels=img_channels,
out_channels=self.in_channel,
kernel_size=3,
stride=1,
padding=1,
bias=False)
self.bn1 = nn.BatchNorm2d(self.in_channel)
self.relu = nn.ReLU(inplace=True)
self.maxpool = nn.MaxPool2d(kernel_size=2, stride=2) #输出14
self.layer_1 = self.make_layer(block, 64, block_list[0], stride=1) #[3]
self.layer_2 = self.make_layer(block, 128, block_list[1], stride=1) #[4]
self.layer_3 = self.make_layer(block, 256, block_list[2], stride=1) #[6]
self.layer_4 = self.make_layer(block, 512, block_list[3], stride=1) #[3]
if self.include_top:
#用于对输入信号进行一维自适应平均池化操作。对于任何输入大小的输入
self.avgpool = nn.AdaptiveAvgPool2d((1,1))
self.fc = nn.Linear(512 * block.expansion(self), num_classes)
#kaiming正态分布
for m in self.modules():
if isinstance(m, nn.Conv2d):
nn.init.kaiming_normal_(m.weight, mode='fan_out', nonlinearity='relu')
#一个序列容器,用于搭建神经网络的模块被按照被传入构造器的顺序添加到nn.Sequential()容器中
def make_layer(self, block, channel, block_list, stride=1):
downsample = None
if stride != 1 or self.in_channel != channel * block.expansion(self):
downsample = nn.Sequential(
nn.Conv2d(self.in_channel, channel * block.expansion(self), kernel_size=1, stride=stride, bias=False),
nn.BatchNorm2d(channel * block.expansion(self)))
layers = []
#print("\n -----make_layer-----",self.in_channel,channel,stride )
layers.append(block(self.in_channel, channel, downsample=downsample, stride=stride))
self.in_channel = channel * block.expansion(self)
for _ in range(1, block_list):
layers.append(block(self.in_channel, channel))
return nn.Sequential(*layers)
#([64, 64, 5, 5])
def forward(self, x):
x = self.conv1(x)
x = self.bn1(x) #[64, 64, 28, 28])
#print("\n 卷积第一层 ",x.shape)
x = self.relu(x)
x = self.maxpool(x) #[64, 64, 14, 14]
#print("\n 最大池化层 ",x.shape)
x = self.layer_1(x) #[64, 64, 14, 14]
#print("\n 残差block1 ",x.shape) #torch.Size([64, 64, 14, 14])
x = self.layer_2(x)
#print("\n 残差block2 ",x.shape) #torch.Size([64, 128, 14, 14])
x = self.layer_3(x)
#print("\n 残差block3 ",x.shape) #[64, 256, 14, 14]
x = self.layer_4(x)
#print("\n 残差block4 ",x.shape) #[64, 512, 14, 14]]
if self.include_top:
x = self.avgpool(x) #[64, 512, 1, 1])
#print("\n avgpool ",x.shape)
x = torch.flatten(x, 1) #([64, 512])
#print("\n flatten ",x.shape) #[64, 512, 14, 14]]
x = self.fc(x) #([64, 10])
#print("\n x.fc ",x.shape) #[64, 512, 14, 14]]
return x
def ResNet18(num_classes=10, include_top=True):
return ResNet(BaicsBlock, [2, 2, 2, 2], num_classes=num_classes, include_top=include_top)
def ResNet34(num_classes=10, include_top=True):
return ResNet(BaicsBlock, [3, 4, 6, 3], num_classes=num_classes, include_top=include_top)
def ResNet50(num_classes=10, include_top=True):
return ResNet(Bottleneck, [3, 4, 6, 3], num_classes=num_classes, include_top=include_top)
def ResNet101(num_classes=10, include_top=True):
return ResNet(Bottleneck, [3, 4, 23, 3], num_classes=num_classes, include_top=include_top)
def ResNet152(num_classes=10, include_top=True):
return ResNet(Bottleneck, [3, 8, 36, 3], num_classes=num_classes, include_top=include_top)
#28×28 灰度手写数字图像
def load_image(batch_size=64):
transform = transforms.Compose([transforms.ToTensor(), transforms.Normalize((0.1307,), (0.3081))])
train_dataset = datasets.MNIST(root='../dataset/mnist/', train=True, download=True, transform=transform)
train_loader = DataLoader(train_dataset, shuffle=True, batch_size=batch_size)
test_dataset = datasets.MNIST(root='../dataset/mnist', train=True, download=True, transform=transform)
test_loader = DataLoader(test_dataset, shuffle=True, batch_size=batch_size)
return train_loader, test_loader
#数据集中每张图像均为[C×H×W]=[3×32×32]即3通道的高32像素宽32像素的彩色图像。
def train(model, train_loader):
running_loss = 0.0
epochs =5
for epoch in range(epochs):
running_loss = 0.0
for batch_idx, data in enumerate(train_loader, 0):
inputs, target = data
optimizer.zero_grad()
#print("\n 输入灰度图的shape: ",inputs.shape)
outputs = model(inputs)
loss = criterion(outputs, target)
loss.backward()
optimizer.step()
current_loss = loss.item()
running_loss += current_loss
#print("\b batch_idx",batch_idx)
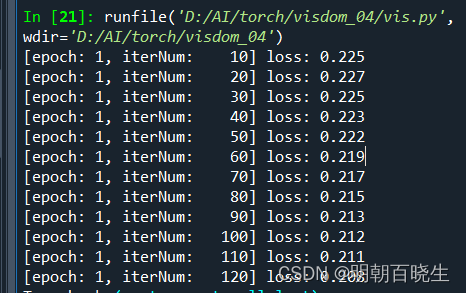
if batch_idx % 10 == 9:
print('[epoch: %d, iterNum: %5d] loss: %.3f' % (epoch + 1, batch_idx + 1, current_loss / 10))
def test(model, test_loader):
correct = 0.0
total = 0
with torch.no_grad():
for data in test_loader:
images, labels = data
outputs = model(images)
_,predicted = torch.max(outputs.data, dim=1)
total +=labels.size(0)
correct +=(predicted==labels).sum().item()
acc = correct/total
print('Accuracy of network on 1000 test images: %d %%'%(100*acc))
if __name__ == "__main__":
batch_size = 64
num_classes=10 #手写数字识别 0-9
model = ResNet18(num_classes)
criterion = torch.nn.CrossEntropyLoss()
optimizer = optim.SGD(model.parameters(), lr=0.001, momentum=0.5)
test_loader, train_loader = load_image()
for epoch in range(10):
train(model, train_loader)
#预测时一定要记得
#model.eval()
#test()
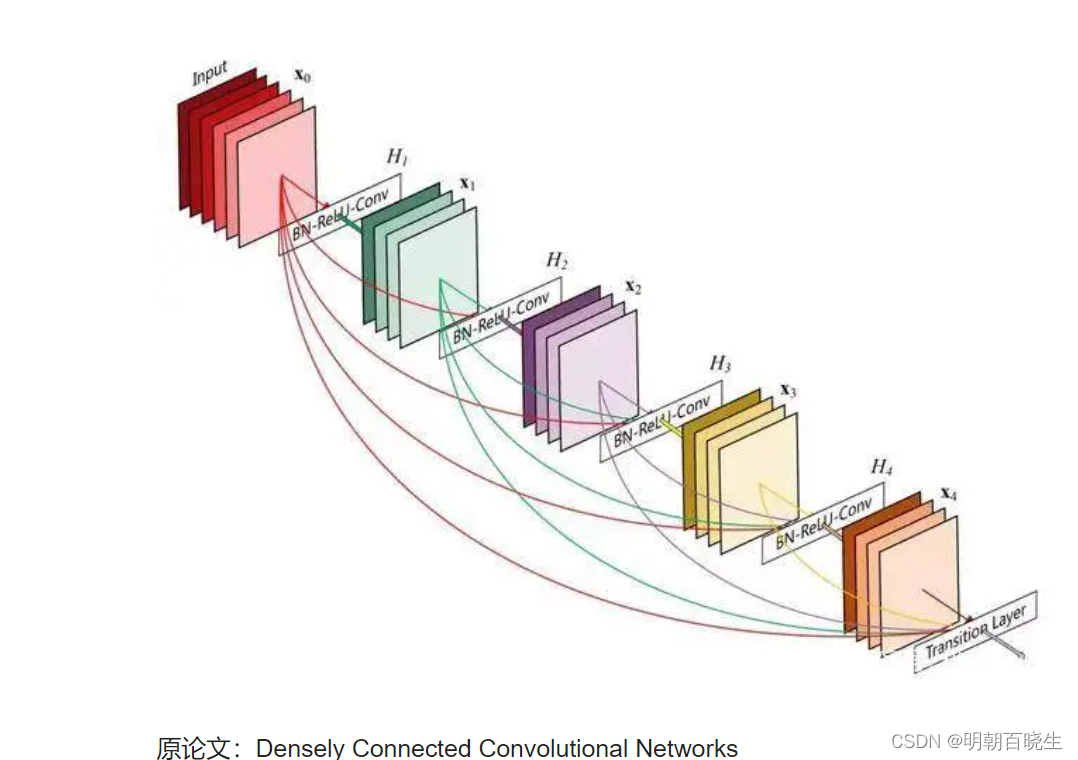
五 Desnet
作为CVPR2017年的Best Paper, DenseNet脱离了加深网络层数(ResNet)和加宽网络结构(Inception)来提升网络性能的定式思维,从特征的角度考虑,通过特征重用和旁路(Bypass)设置,既大幅度减少了网络的参数量,又在一定程度上缓解了gradient vanishing问题的产生.结合信息流和特征复用的假设,DenseNet当之无愧成为2017年计算机视觉顶会的年度最佳论文.
简单讲: ResNet 残差层 identity 只跟前一层输入有关系,
DenseNet 则跟前面所有的层有关系。同时不是简单相加关系
是concat
参考:
深度学习:残差网络(ResNet),理论及代码结构 - 知乎
https://www.cnblogs.com/shine-lee/p/12363488.html
ResNet论文逐段精读【论文精读】_哔哩哔哩_bilibili
ResNet_哔哩哔哩_bilibili
Pytorch实现ResNet_baicsblock_殇小气的博客-CSDN博客
|